")
")


In this practice lesson, we will continue exploring how to use Joomla 5 Modules effectively so you can fully utilize their flexibility.
In Practice Lesson 01, you: Installed a DEMO to populate your Joomla 5 website with sample content. Installed XiroAdmin to enhance module management. Added a Custom Module to insert an image in the left sidebar of the Frontend.
Video Clip Practice Lesson Using Modules
To make your practice easier, follow along with the video while referring to this written guide for additional details.
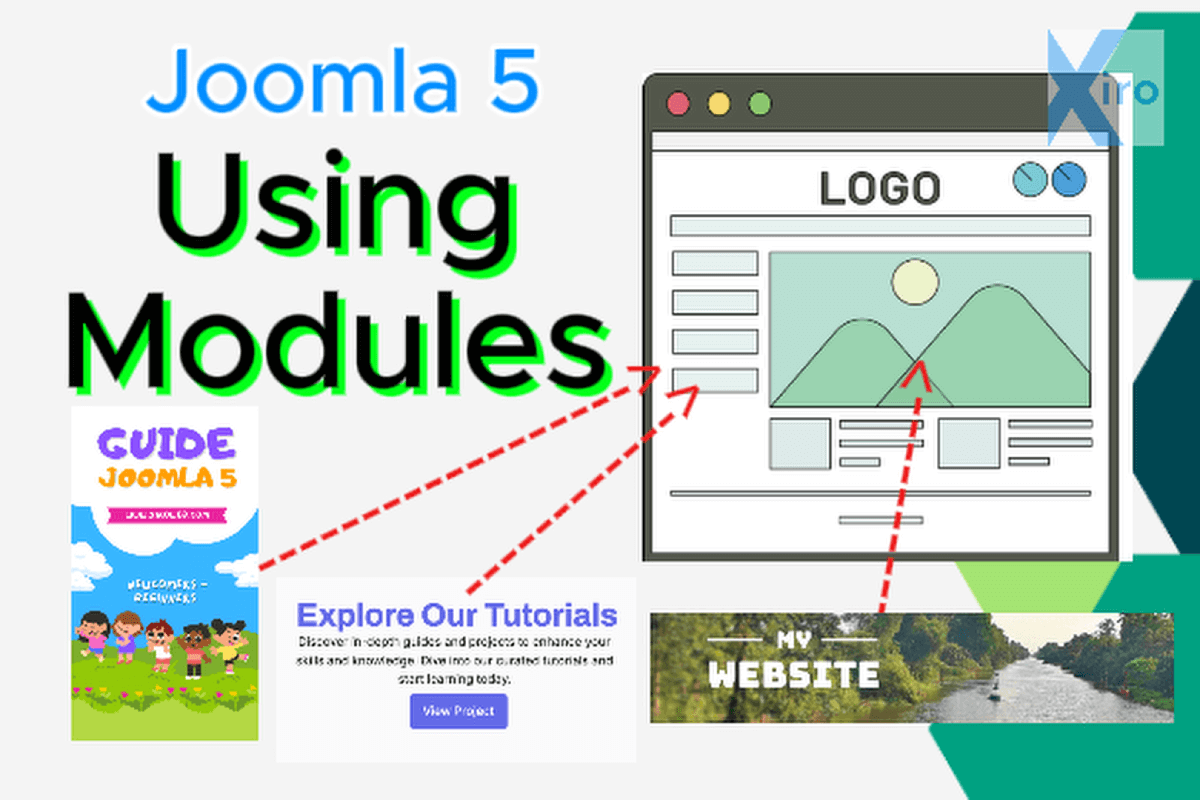
Modules are commonly used to add various elements such as information blocks, images, lists of the latest articles, menus, and more to one or multiple pages on a website. In addition to appearing on different pages, modules can also be placed in various positions on a webpage—such as the left column, right column, footer, header, or even the center—depending on your needs.
Each template comes with predefined positions, which determine where modules can be placed.
Difference Between Modules and Articles
- Articles (Content Items): Each article has a unique URL. When you visit that URL, the full content of the article is displayed. The Menu Manager also allows you to create specific URLs for different articles.
- Modules: Unlike articles, modules do not have unique URLs. Instead, they can be assigned to appear on article pages or other URLs created via the Menu Manager.
Now, in this lesson, you will learn how to adjust and modify your module with essential settings that every Joomla user should know. Let's continue working on the module we created in the previous lesson!
By Default, New Modules Appear on All Pages
Scroll down to find the Module Assignment section. By default, when you add a new module, the option "On all pages" is selected. This means the module will be displayed on every page of your website.
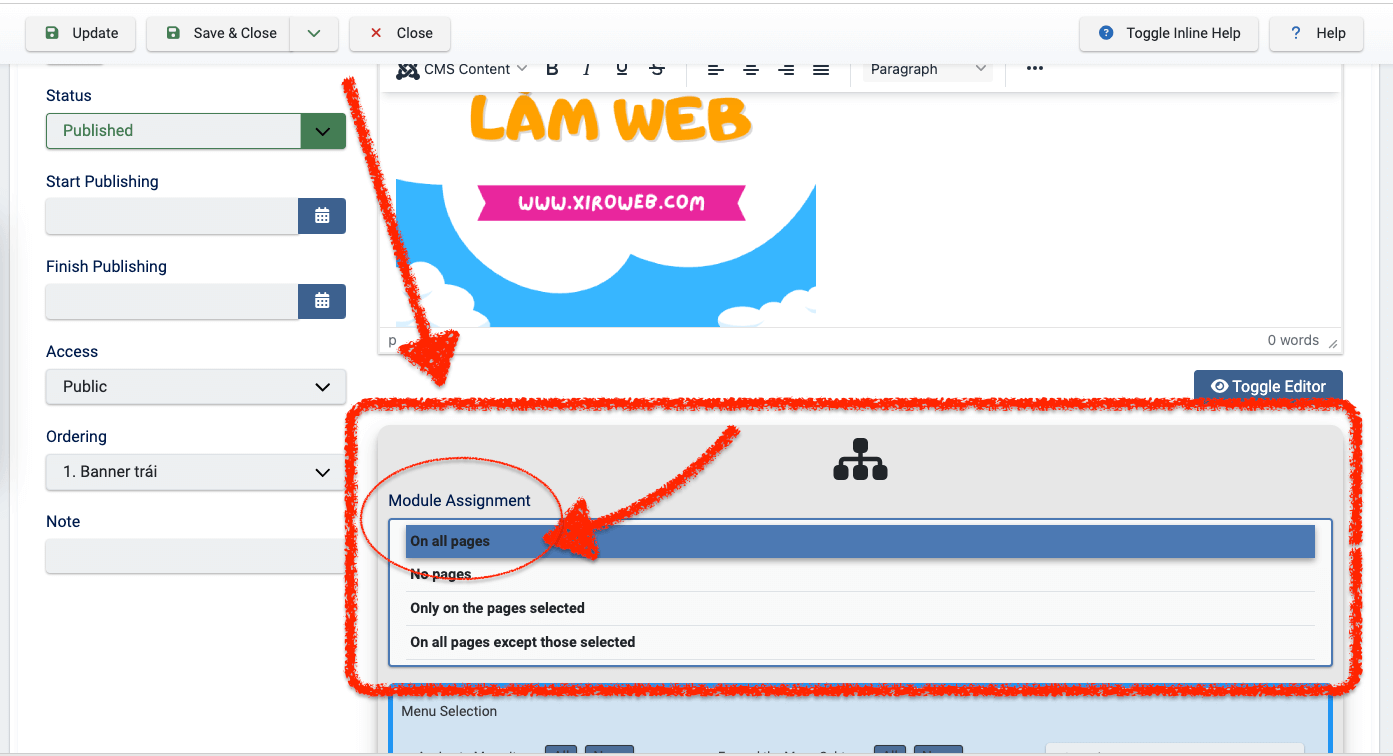
Typically, you would use the "On all pages" setting for modules that contain elements like the footer, menu, or sidebar content—especially for personal blogs or informational websites.
Now, open your Frontend website and click through the menu items. You will see that the banner image appears on every page you visit.
Assigning a Module to Specific Pages
This option gives you greater flexibility and control over where your module appears. However, many beginners overlook this feature, missing out on one of Joomla's most important module customization tools.
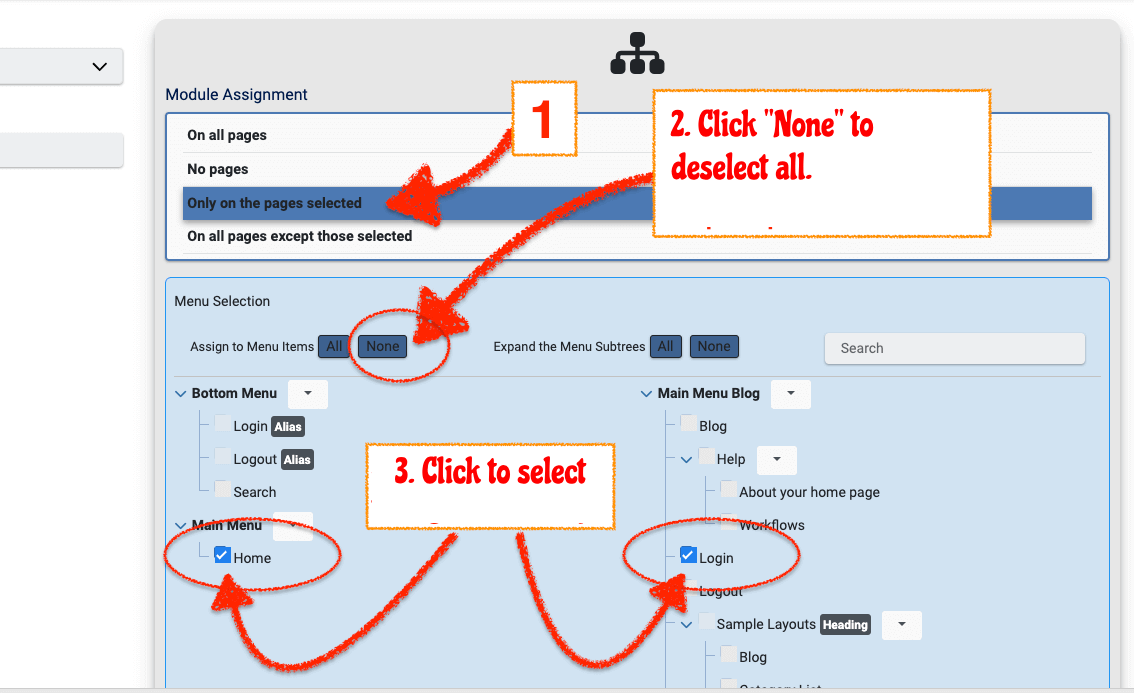
Select "Only on the pages selected" (as shown in the image, position 1). This will open additional selection options below.
For this exercise, reset all previous selections by clicking the "None" button.
Next, check "Home" and "Login" to assign the module to these specific pages.
Click Update to save your changes.
Now, open your Frontend website and navigate through the menu. You'll notice that the banner image now only appears on the Home and Login pages.
Practical Application
Module Access - Display Only for Logged-in Accounts or Admin.
In the future, when you add a registration and login feature to your site, you'll need to display information that is visible only to logged-in users. You might also want to create content for a VIP group. The Access setting helps you control exactly who can see the module.
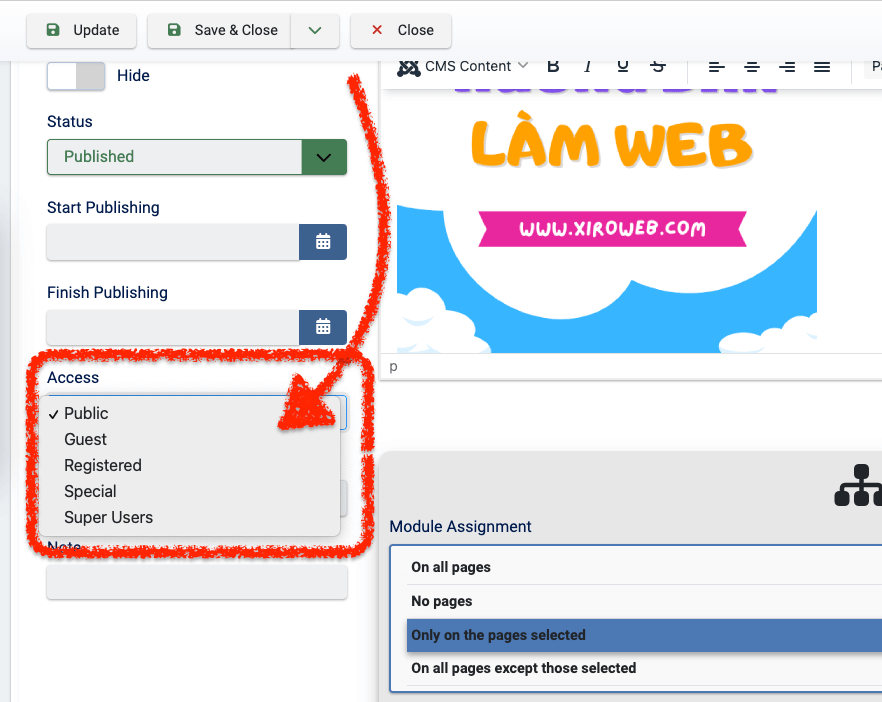
The default user access groups are:
- Public: Accessible to everyone.
- Guest: Visible when someone visits the site without logging in.
- Registered: Visible to users who have logged in with a standard account.
- Special: For users with higher access rights, such as content writers, editors, or teachers. These users have more privileges than regular Registered users.
- Super Users: The highest level of access. Users in this group can view and edit everything on the website.
Practical Application:
- Access Guest: Display a message inviting users to register for the website. This will only show when users haven't registered or logged in. If they've already registered and logged in, you don’t need to show the registration prompt. If you set the access to Public, it will show whether the user is logged in or not. So, you should select Access Guest to only show the message for non-logged-in users.
- Access Registered: This will display the module for users who have logged in. You can show information that should only be visible to logged-in users.
- Access Special: Typically used to display internal information for admins or website operators.
Practical Example:
After logging into XiroWeb, a member-only top menu appears, which won’t show for users who haven’t logged in.
Other Joomla 5 Modules for Website Development
Joomla modules are very versatile and can be used in many different ways to enhance your website’s functionality.
Displaying Menus
You can display menus on your Joomla 5 website using either:
- The built-in Menu Module in Joomla 5.
- The Xiroweb Bootstrap Navbar Module, which allows you to customize and preview the menu layout conveniently.
Displaying a Slide Banner
- Xiroweb Carousel Bootstrap Module: Creates an image slider with text content inside, following the Bootstrap 5 Carousel structure.
- Xiroweb Simple Slide Module: A lightweight image slider that works with the Swiper library for smooth transitions.
Adding More Modules
There are many additional modules you can explore by searching for Joomla Modules. You can also check out Xiroweb’s Joomla 5 modules for more specialized features.
Video clip from Practice Lesson 01 and Practice Lesson 02
In the next Practice Lesson 03: Enabling SEF URLs in Joomla 5 for Better SEO, you will enable SEF to create SEO-friendly URLs based on keywords.
Similarly, Practice Lesson 04: Mastering Joomla Menu System – Building a Site-Wide URL Path Permalink Structure will guide you in generating custom URL path permalinks according to your preferences.
Dustin Dzung - XiroWeb
Dustin Dzung with 15 years of experience in using and developing websites with Joomla!, from the first version of Mambo to Joomla! 1.0 and up to the present Joomla! 5.x.