")
")


This practice lesson will guide you through creating search engine-friendly (SEF) URLs in Joomla to improve your website’s SEO performance.
What is a URL?
Whenever you copy a link to share, that link is a URL. When you open a webpage in a browser like Chrome and click on the address bar, you’ll see the full URL displayed.

What is SEF?
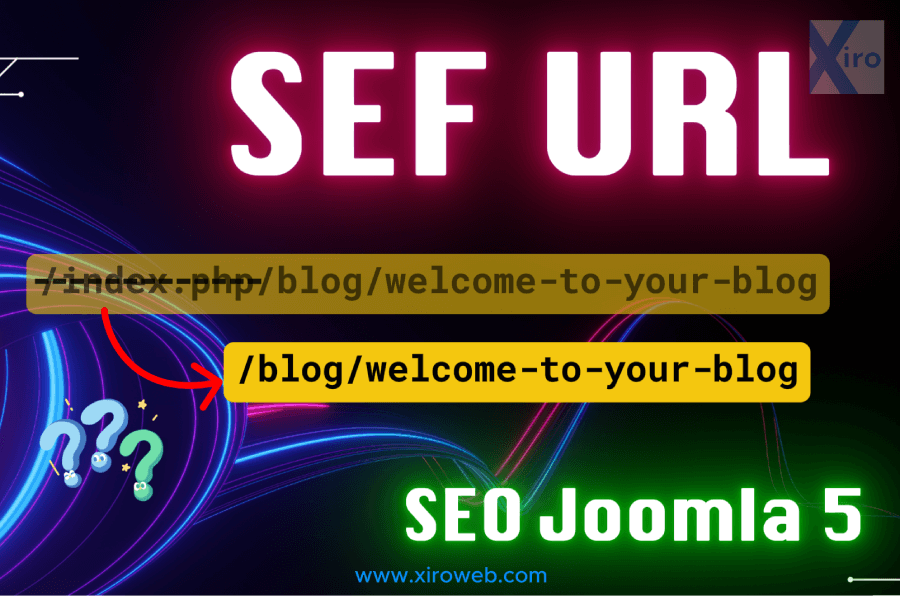
SEF (Search Engine Friendly) URLs are URLs optimized for search engines, making them cleaner, more readable, and descriptive of the page’s content rather than relying on complex parameters
Example:
- Non-SEF URL:
https://example.com/index.php?option=com_content&id=123&task=view - SEF URL:
https://example.com/blog/introduction-to-sef-urls
Benefits of SEF URLs:
✅ Better SEO: Search engines can understand your page content more easily.
✅ Improved User Experience: Users can quickly recognize and remember clean URLs.
✅ Easier Sharing: Shorter, more meaningful URLs are better for sharing on social media or via email.
Default Joomla URLs
By default, Joomla generates URLs that are not very clean or readable. Why is that?
Ví dụ như: https://example.com/index.php?option=com_content&id=123&task=viewhttp://example.com/index.php/component/tags/tag/worldwide
Why Aren’t SEF URLs Enabled by Default?
Joomla is designed to run on multiple operating systems and server environments, such as:
- Linux with Apache or Nginx
- Windows with IIS
Since SEF URLs depend on server configuration, enabling them by default could cause errors, especially for new users installing Joomla for the first time.
SEF URLs rely on specific server configurations, and enabling them by default could cause compatibility issues. In some cases, it might even prevent Joomla from running properly during the initial installation.
For first-time Joomla users, encountering an error message right after installation can be frustrating and discouraging. To ensure Joomla works smoothly across different systems, SEF URLs are disabled by default.
Users need to manually enable SEF URLs after installation.
Enabling SEF URLs and Removing index.php on an Apache Server (XAMPP)
Step 1: Rename htaccess.txt to .htaccess
htaccess.txt, which needs to be renamed to .htaccess (with a dot at the beginning). This file is located in the root directory of your Joomla installation.
A. Renaming the File in XAMPP on Your Local Computer
Important Note: Windows Explorer does not allow you to rename files starting with a dot. You will need to use an alternative method:
- Use an FTP client like FileZilla to rename the file on your local machine.
B. Renaming the File on a Live Server (cPanel Hosting)
If your Joomla website is hosted on a cPanel-based server, you have two options:
- Use FileZilla or another FTP client to connect to your hosting and rename the file.
- Use the File Manager in cPanel to rename it directly through the web-based file management tool.
Once this step is completed, proceed with enabling SEF URLs in Joomla settings.

Accessing the File Manager in cPanel


After renaming the file, open your website’s Frontend to check if it’s working properly.
- If everything works fine, proceed to the next step.
- If you encounter errors, it might mean that your server configuration is not compatible with SEF settings.
To revert the changes:
- Rename the file back to htaccess.txt.
- Skip this lesson for now and continue with the next practice session. We will address this issue later.
Step2: Configuring SEF URLs in Joomla Backend
To enable SEF URLs, follow these steps:
- Navigate to Menu → System → Global Configuration.
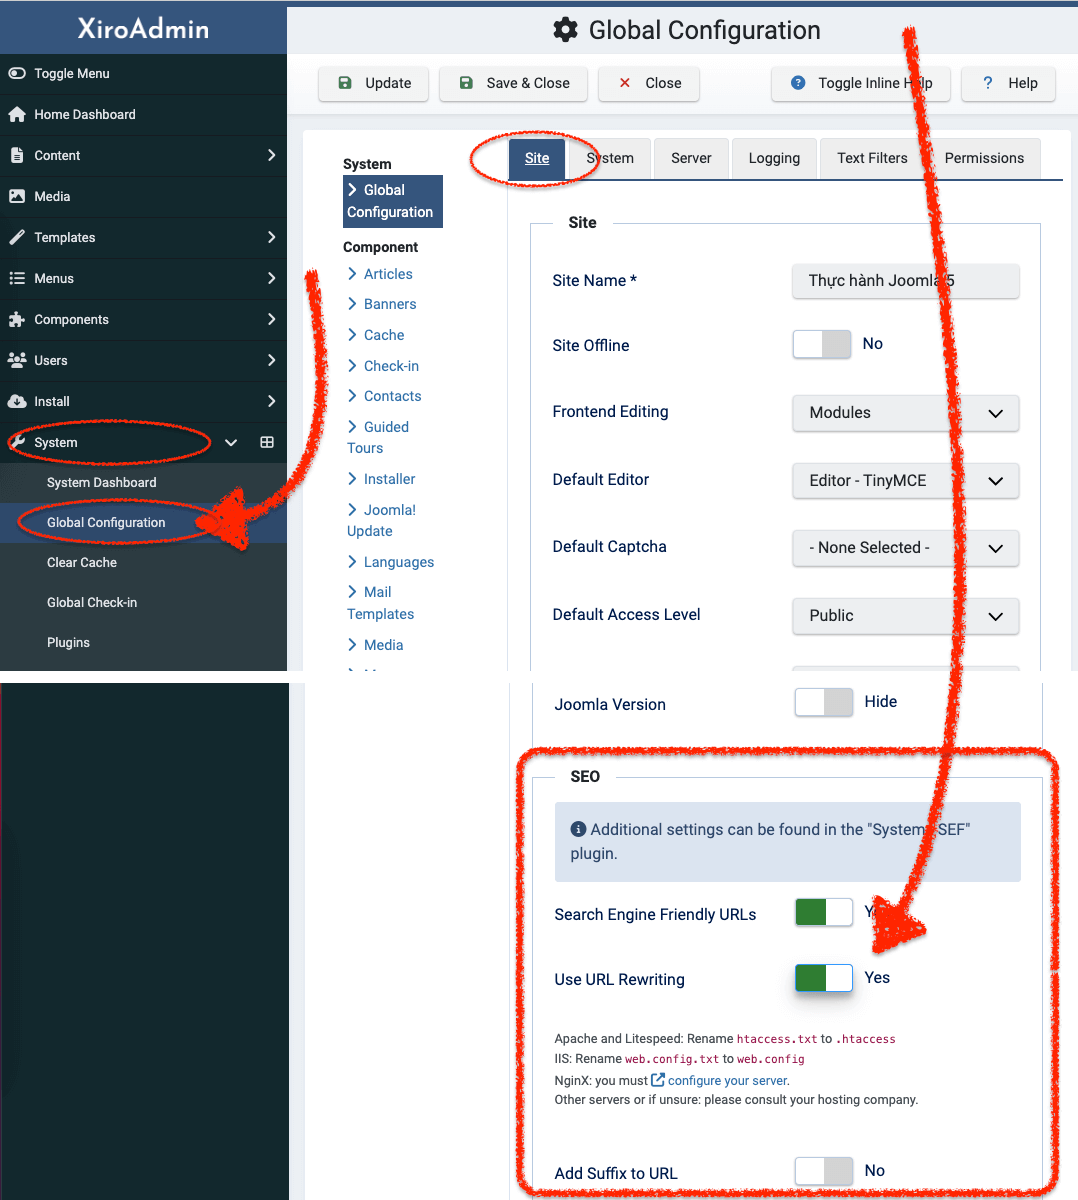
Find the Search Engine Friendly URLs field and set it to Yes.
Enable Use URL Rewriting by selecting Yes.
Save the settings and check your website’s Frontend to see if the URLs have changed to a more user-friendly format.
Troubleshooting Errors
If your website encounters errors after making these changes, it could be due to server incompatibility. To fix this:
- Rename the file back to htaccess.txt to restore the previous settings.
- Skip this lesson and move on to the next practice session. We will revisit this issue later.
For Servers Running Nginx or Windows
If your server runs on Nginx or Windows, additional steps are required:
- For Nginx: Follow Joomla’s official guide here: Joomla Nginx Configuration.
- For Windows (IIS Service): Rename web.config.txt to web.config.
Similarly, Practice Lesson 04: Mastering Joomla Menu System – Building a Site-Wide URL Path Permalink Structure will guide you in generating custom URL path permalinks according to your preferences.
Dustin Dzung with 15 years of experience in using and developing websites with Joomla!, from the first version of Mambo to Joomla! 1.0 and up to the present Joomla! 5.x.